Wednesday, November 23, 2016

Week 9: Abstract Photography

This lesson we focused on abstract photography. Abstract photography focuses on shape, form, colour, pattern and texture. Moreover, it is unlike most other types of photography because there are no rules- composition, focus etc. Instead, the photographer has to use their own imagination to create a photograph.

The viewer is often unable to see the whole object or even tell what the subject is because usually the photographer has taken just a small portion of the subject so that the viewers may only know the essence of the image subject and understand what is implied. Abstract photography may not mean the same thing to everyone.

Things to think about when taking abstract photographs:
- Subject
- Lighting and shadows- use black and white to emphasize this
- Perspective
- Focus- you could use a slow shutter speed to get a blurred effect
- Patterns
- Shapes
- Colours
- Cropping- crop an image tightly

These are some images that I took today- some images I cropped tightly using Photoshop while some I just left them be.


We also had some Abstract Challenges to do like...

1. M&Ms

Place a piece of glass or perspex between two standsSpray the glass or perspex material with water using a spray bottle and then place an objects underneath to create some bubbly images. 

Camera settings should roughly be:
  • ISO 100
  • Aperture f/16 – f/18
  • Shutter speed 1/250

This was the effect I got:


I chose not to focus on the last two images because I wanted to see how the colours would look like when I am not focusing.

2. Cutlery
We simply placed some cutlery against the wall and included some shadows. I don't really like the way I photographed this and I would definitely try again to improve. 


 3. Slinky
Again, I focused on the shadows of the slinky.


4. Oil on Water
Place a glass dish on top of some colourful background material like coloured paper. Fill the dish with water and add a small amount of dishwashing liquid and oil

Camera settings should roughly be:
  • ISO 100
  • Aperture f/16 – f/18
  • Shutter speed 1/250
  • Manual focus 

 
This was the effect I got, I think this would have look nicer if the background behind was even more colourful.


Thursday, November 17, 2016

Week 8: Halloween Portrait Photography

Since Halloween was just a few days ago from our last lesson, we had to dress up in our Halloween costumes to take portraits. We left school to Bowen Road and took a few pictures there as well as in the school. I lent my camera to my classmates to take some pictures of me when I had to pose. We had to compile a shot list of things we should try to take pictures of; my shot list included: rule of thirds composition, framing, close-up, posing, contrast of colours and maybe perspective.

I like this image because of the composition and how she is staring at something far off. This fulfilled the close-up in my shot list.

I like this image because of the rule of thirds composition, the background and how the sword reflected light. This fulfilled the posing in my shot list.

I like this image because of the cool natural background at the back and how again the subject of the image is staring at something out in space. This fulfilled the rule of thirds composition in my shot list

I like this image because I framed her face unintentionally with diagonal handrails. This fulfilled the framing in my shot list.

I like the rule of thirds composition and how there is unintentional reflects of light around in the background.

I like this image because of the blurred background and how we cannot really see where she is looking at exactly.

This picture shows perspective but I don't really like the composition of the image because my arms are cut off and you can't really see what my arms are holding onto. This fulfilled the perspective in my shot list.

Wednesday, November 2, 2016

Week 7: Street Photography Part 2

This week we went on a trip to Hollywood Road in Central. We had to think about composition a lot and capture at least two images from the challenges below:

Portraits - Candid: shots of people going on with their daily lives
Portraits - Ask a stranger: asking a stranger whether or not you can take a photograph of them and basically getting rejected a lot
Rule of thirds: taking photos where the main subject is falling in one of the divisions or on the line
Viewpoint: changing the angle you are getting your shot from- up, down etc.
Diagonals: gives a picture some perspective and makes it look more dynamic
Pattern: taking pictures of the patterns, textures, shapes and colour which can make a photograph visually compelling
Shadows & Reflections: using light creatively to capture unique patterns
Leading Lines: when subjects in a photograph are placed in a way so that it paves a line for the eye to follow through- typically leading to a subject
Framing: using the natural surroundings to frame your subject
Symmetry: a photograph that looks the same on one side as it does on the other
Photo Essay: capturing images for your photo essay

I couldn't get all of these photographs during our trip, but I got most of them. Some pictures I am proud of from the trip are here:

Portrait: Ask a Stranger
I asked this particular stranger to take a photo because I found it fascinating how her face was looked so hard and how weirdly it was. I felt very rushed when taking this picture and couldn't get the composition right- the head looks cut off from the body and the neck

Portrait: Candid
This is a candid photograph of this girl I saw sitting on the streets. I liked how she was staring at something faraway and how she sat right in front of a really nice diagonals background. I also thought about the composition, placing her on the left third.


Although this didn't fit any of the challenges, I really like the street art and therefore took a photograph of it. 

Patterns
A photograph of some fabric patterns I saw on one of the fences when walking by. I thought about my composition in a way that I took a close-up to "fill" the pattern on the whole shot area.

Patterns
I was trying to imitate what I saw when researching for photo essay ideas- dense architecture with close ups of the windows. I think it turned out okay except that it is slanted but it looks a bit more interesting this way anyways.

Rule of Thirds
I really thought about the composition here because I placed the guy and the eyes on the line if there was a rule of thirds grid here.

Viewpoint, Symmetry, Leading Lines
This photograph is a mix of many things. It shows view pointing because I took this photograph from a low angle to show the height of the building. There is nice symmetry here too and there's a leading line pointing to the sky.

Since I couldn't get all the challenges done on the trip, I had to take photographs as homework as well. I took the opportunity to take some photos when I was at Ocean Park over the weekend. Here are my shots:
This shows pattern and contrast between colours

This shows contrast between colours

This shows symmetry

This shows horizontal lines (instead of diagonals)

This shows view pointing and pattern

This shows reflection

Week 6: Street Photography Part 1

Since this week we were supposed to be going on a trip but school was closed because of Typhoon 8, we looked at a blog on street photography in preparation for the trip next week.

Link to blog:
http://erickimphotography.com/blog/the-ultimate-beginners-guide-for-street-photography/

I found this post very interesting and informative because it gave me a great deal of things to look for when shooting on the streets, how to overcome the fear of shooting on the streets and different types of compositions we should try to achieve when taking photographs.

I also clicked on a couple of the links on that post like these:
http://erickimphotography.com/blog/2013/08/07/what-is-street-photography-2/
http://erickimphotography.com/blog/2011/05/09/how-to-become-a-fearless-street-photographer/
http://erickimphotography.com/blog/2016/08/05/15-street-photography-techniques-and-tips/
and then read them

Furthermore, I read some of the linked posts on some types of compositions that I don't know about like:
- Triangles (hard to achieve)
- Figure to ground
- Depth
- Spot the not
- Self portraits
- Colour theory

Thursday, October 13, 2016

Week 5: Photo Essays

We started working our final photo essays this week. A photo essay is basically a collection of images based around a theme that might have a message or a story behind it.

Firstly we started off by cutting out different images from newspapers and then we put them together to send a message or to tell a story. My group's collage looked like this:


And the story behind it goes like this...

One day there was a boy who was reading the newspaper and found about many things- people crying in despair because their family member died, homes being ruined to the point where no one could reside in it anymore, people fighting for their freedom, people suffering...that was when the boy realized that the world wasn't perfect and happy, it was brutal and cruel.

I think we chose great images that use many different composition rules like the rule of thirds. 

These are some other collages from other groups~


We then looked at a few example photo essays online and created a mind map filled with ideas of photo essays we could do. 

Links to the photo essays we took inspiration from:

Our final mindmap looked like this:


From this mindmap, I wanted to do my photo essay on doors but this is something I heard someone was doing so I decided to change my topic to windows or bikes. I want to take pictures of windows in the village that is near where I live because even from observing far away, the variety of houses are quite vast so I think there will be many different types of windows for me to take pictures of. I am planning to take my photos on one of the weekends.

Week 5: Photo Essay- Develop Visual Literacy

Develop Visual Literacy


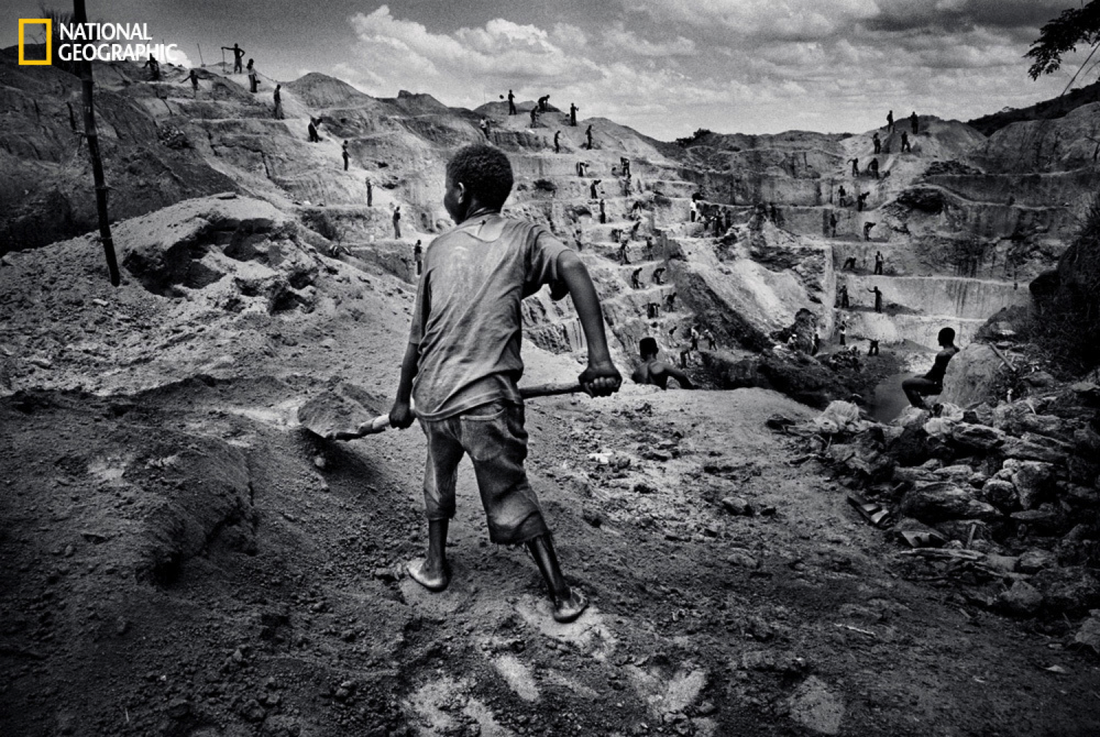
In this task, we looked at a picture from National Geographic and then answered questions on it. 
This is the picture-


1. My eyes went to the tiny black figures of boys and men at the background first then travelled to the boy with the shovel.

I think this happened because the children are poor so they can only earn money in these ways.

2. The picture is busy because they're many people in the background and this affected the journey my eyes toom because I had a lot to take in before focusing on one main subject.

3. I think the light is coming from the sky because there is sunlight. The area where the boy with the shovel is at is darker than the mountain area, showing that the light is coming from behind the boy.

The time of day is in the afternoon because there is a strong sunlight and everybody in the picture seems to be sweating a lot.

This affects the mood in a way that it makes the picture very solemn and sad.

4. Some extra details:
- The climate of the picture is dry
- The weather is very hot 
- The setting is a hot and dry mountain / desert area.
- Little vegetation
- Everyone is working hard shovelling
- The giant hole in the middle is a manmade one meaning that they probably dug it

5. The answers to question 4 tell me about the setting which is probably someplace in Africa where the families there are very poor, therefore, children have to work to earn money. However, this still doesn't tell me why and what they are digging for

6. I cannot see anything that could explain why they are digging and what they are digging for. Perhaps they should add a short caption explaining or just add something into the photograph that could explain this mystery.

7. The photographer is at the same level as the subject of the picture and near to the boy. If the photographer was further away, I would be able to see more of the setting and the people in the background working.

8. My caption: The Price of our Possessions
(With some research, I found out that these boys are digging for precious metals and minerals that we use for our mobile phones and our gadgets)

9. In my opinion, the photographer wanted us to see the story and the truth behind our smartphones so that we can do something to stop the cheap labour and to stop using conflict minerals.

-----------------------------------------------------------------------------------

Other than this, we also had to comment what we see, we think and wonder on some impactful pictures. By impactful pictures, I mean these...


I see two water fountains, one for coloured people and one for white people. There is a man drinking from the coloured fountain and he is gazing wistfully at the white fountain. I think that this is very unfair against coloured people because they aren't any more different than us except for their skin colour. I wonder how this man felt about the discrimination.


I see a soldier playing the piano in the middle of the woods. The background looks very wrecked and ruined by war. I think that the soldier is thinking about his home and how life was before the war. I wonder how the piano got there in the first place and when the war will end so that the soldier can finally go home.


I see scratch marks on a wall in a dark room. I think this is the scratch marks of human fingernails when they were in pain. I wonder what the story is behind the scratch marks and how the humans felt when they were scratching the wall.


I see three fashionable and rich girls standing on the street and posing for a photograph while there is a homeless guy sitting on the stairs right next to the girls. I think that the girls are trying to take a photograph with the homeless guy. I think that the photographer is trying to show the huge poverty gap between the rich and the poor. I wonder how the photographer got this shot and how the girls know feel seeing themselves represented in this way.


Week 4: Lighting

Today we focused on lighting. We learnt about natural and artificial lighting and how to use light in favour of our shot.

Light is the key to the look, mood and atmosphere of photographs. The direction of light will affect the shape and texture of the subject, the colour and how soft or harsh the light can really change the subject's appearance. These three factors are the basic characteristics of light. 

To tell us about the lighting, looking at shadows is a good method. Harsh and direct light creates strong and well-defined shadows and vice versa. The location of a shadow tells us where the light is coming from as shadows are always opposite the light.

We did four different activities related to lighting in this week:

In the first activity, we got two lamps and cut out coloured gels that were slightly larger than the lamp itself. Then we taped the gels onto the lamp. When we switched the lamps on, we got a nice background colour on our neutral background. Next, we experimented with these lamps by changing the distance between the lamp and our object we brought in (I brought in a small decorative vase) and by putting different coloured gels onto the lamp for a variety of effects. 

Here are some photographs I took during this activity. 


A challenge during this activity was that I couldn't get the tripod sorted out and it was hard to keep my hand steady without a tripod. 

In the second activity I played with bokeh. Firstly, I had to create a bokeh lens and I did this by making a fake lens hood that fits my lens, then I cut out a circle that was as wide as my lens. I stuck one of the bokeh templates onto my circle and then set my camera to the lowest aperture value and experimented. I went to this really dark room where some fairy lights were set out and took photos of the lights. I found this pretty hard and the photographs I took were pretty messed up. 

In the end, I took off my bokeh lens and took regular photographs of the fairy lights. This was also challenging because I had to set my camera to the correct settings to get decent photographs where the lights were just a tiny dot in the dark background. The settings I used was the lowest aperture value, a super super super slow shutter speed and an ISO about 400. My end product was this: 


The third activity was to build a box studio which was then used to photographs outdoor. However, I only got to make my box studio but was unable to take any photographs because I ran out of time. 
Building a box studio was done by...

1. Get a cardboard box, tissue paper, white card, strong tape, a cutting knife and a cutting board
2. Strengthen the cardboard box by taping the bottom of the box and remove the two flaps at the top of the box
3. Cut out windows on three sides of the box which is basically three big rectangular holes. If the sides of the box are unstable, use extra card to make it more solid
4. Tape tracing papers over the windows and white card over the two flaps on the top of the box
5. Cut out white card to fit the inside of the box as a background, this should cover the back and the bottom of the inside and have a smooth angle. 
6. You are now ready to take a photograph!

This is what the end-product would have looked like:
(picture from the internet)

I didn't get time to complete the fourth and final task which was taking a photograph of yourself with a umbrella lined with tin foil in a dark room.